Friday 1 April 2022

How to Create an Oracle Wallet SSL Certificate Request Containing Subject Alternative Name?

Certificate Problem

I recently had an issue after configuring Oracle HTTP Server SSL for a customer. The customer was using self-signed certificates which they managed and created themselves. I created the certificate request using the Oracle Wallet Manager as per usual and they then sent me the certificates to import into the wallet. Unfortunately the users were seeing this error when they connected to the EPM Workspace, even though the certificates were imported successfully:


Your connection is not private.
Attackers might be trying to steal your information...
NET::ERR_CERT_COMMON_NAME_INVALID

The customer determined that the issue was because the certificate didn't contain a SAN or subjectAltName (Subject Alternative Name) field. Unfortunately, the Oracle Wallet Manager UI doesn't contain a field for the SAN when you create your certificate request:


The Subject Alternative Name (SAN) is an extension to the X. 509 specification that allows users to specify additional host names for a single SSL certificate. The use of the SAN extension is standard practice for SSL certificates, and it's on its way to replacing the use of the common name. 

So, how do we create a certificate request which includes the subjectAltName parameter? 

Windows Command Line to the rescue! Fortunately orakpi, the command line utility for the Oracle Wallet supports the additional subjectAltName  parameter. For a Oracle EPM Hyperion 11.2.x installation it can be found in the bin folder of your Oracle Client install e.g. Oracle\Middleware\dbclient64\bin

Create the Wallet Using ORAKPI

You will need to set the JAVA_HOME in your command line session before you run the command. To create the wallet using orakpi run the following command:

orapki wallet create -wallet D:\Oracle\SSL -pwd Password -auto_login


Create the Certificate Request Using ORAKPI

We can now use orakpi to create the certificate request which includes the subjectAltName parameter. First we need to get the main body of the distinguished name (DN) of the certificate request. We can use the Oracle Wallet Manager to create this for us by entering the information in a dummy certificate request and then just copying the DN string (close and don't save afterwards):


Copy the DN entry and you can paste this into your command line entry.

orapki wallet add -wallet D:\Oracle\SSL -dn "CN=hyperion.brovanture.com, OU=IT Services, O=Brovanture Ltd, L=Manchester, ST=Manchester, C=GB" -keysize 2048 -addext_san DNS:hyperion.brovanture.com

Notice the last part of the command. This is where we have added our SAN parameter, the one we couldn't add when generating using the Oracle Wallet Manager UI.

You can now go back to using the Oracle Wallet Manager UI to manage the export of the certificate request containing the SAN and import of the new certificates once you receive them. You won't be able to see the SAN entry in the UI but don't worry, it's there just not displayed.


Tuesday 15 March 2022

EPM 11.2.8 FDMEE ODI Upgrade Issue

I encountered an issue this week when upgrading an 11.2.2 EPM environment to version 11.2.8. 

Note that is is only an issue when using an Oracle database and when upgrading from a version older than 11.2.5.

The problem occurred at the "Manual Configuration Tasks for FDMEE" task where you  run the RCU Upgrade Assistant (UA.bat) to manually upgrade the version of ODI used by your FDMEE instance. I got the following errors:

  • The specified database does not contain any schemas for Oracle Data Integrator or the database user lacks privilege to view the schemas.
  • Cause: The database you have specified does not contain any schemas registered as belonging to the component you are upgrading, or else the current database user lacks privilege to query the contents of the schema version registry.
  • Action: Verify that the database contains schema entries in schema version registry.  If it does not, specify a different database.  Verify that the user has DBA privilege. Connect to the database as DBA.


The problem is that the UA assumes that we used the RCU to create our ODI repository which is not the case. In the EPM world your ODI repository is created inside your FDMEE repository when you configure FDMEE. 

The UA will look at the SYSTEM.schema_version_registry table to check the version of ODI but it is missing from our table:

So the UA errors with the messages listed above.

You also see the following error message if you try and connect to the ODI repository using the ODI Studio:

  • ODI-10179 / ODI-26168: Client requires a repository with version 05.02.02.09 but the repository version found is 05.02.02.07

There's a support document (2699076.1) which explains how the ODI version matches with the schema version. We'll use this in our hack later:
  • The "05.02.02.07" corresponds to ODI Version 12.2.1.3.0.
  • And "05.02.02.09" is for Versions 12.2.1.3.190708, 12.2.1.4.0 and 12.2.1.4.200123.

To get around the issue I ran the RCU to create a bogus ODI repository. This also creates the entry in the SYSTEM.schema_version_registry table necessary for me to run the upgrade assistant:


This creates the entry for ODI in my SYSTEM.schema_version_registry:

However, as you can see above it is pointing to the new bogus ODI repository and the version is incorrect because I used the upgraded EPM 11.2.8 version of the RCU (12.2.1.4.0) to create the entry.

I ran the following SQL to change the schema from EPM_ODI_REPO to my FDMEE schema EPM_FDMEE and changed the version from 12.2.1.4.0 to 12.2.1.3.0:

update system.schema_version_registry set OWNER='EPM_FDMEE', VERSION='12.2.1.3.0' where COMP_ID='ODI';
commit;

Now you can see the schema and version are correct:


I was then able to run the UA successfully:


The SYSTEM.schema_version_registry is then updated with the upgraded information:


The upgrade was successful and I was also able to login to ODI using the ODI Studio as there was no longer a mismatch between client and repository versions.

If I were to run into this again I would just insert the ODI row into the SYSTEM.schema_version_registry table directly using SQL with the correct schema and version rather than running the RCU and then editing.

Happy upgrading!


Wednesday 1 December 2021

OAC - Using CLI to Automate Starting-Stopping of Instances

A couple of years ago I blogged on how to start and stop Oracle Analytics instances using the REST API. This enabled you to schedule scripts to manage the uptime of your instances so you can save those valuable oracle credits. This worked well for the old Autonomous instances but those scripts no longer work with the newer Gen2 OAC architecture. In this blog I’ll show how to use the Oracle CLI (Command Line Interface) to control your instances. 

The Oracle CLI is very simple to use, requires no coding skills and has the added bonus of being able to manage most of your Oracle Cloud Infrastructure tasks (e.g. managing DBaaS instances or virtual machines etc).

Pre-Requisites

You will require an IAM user account (non-IDCS) in your Oracle tenancy to run the CLI commands. You will need the OCID value for this user:


You also need the OCID value of your Oracle tenancy:


Installing the Oracle CLI on Windows


You can install on either Linux or Windows. I've chosen Windows as it's what most of our customers use. 

I followed the Oracle documentation on how to install CLI on Windows here: https://docs.oracle.com/en-us/iaas/Content/API/SDKDocs/cliinstall.htm 

Here is the process in a nutshell:
  • Download a powershell script
  • Run the powershell script. 
    • This will download the Python and install it.
    • It will also download the CLI and install it.

Initially, I installed Python manually but the auto-installer kept failing on the import ssl statement. I ended up deinstalling Python and getting the installation utility to install python for me.
This version of python is older (3.6) than the one I installed (failed with both 3.9 and 3.8).

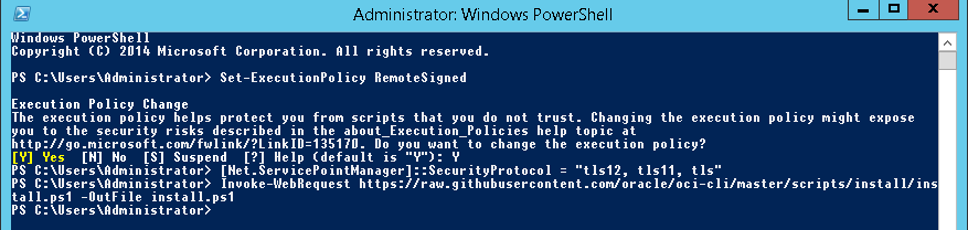
Here are the commands you need to run:

Start Powershell as an administrator.

Set-ExecutionPolicy RemoteSigned 
(allow the script to run).

[Net.ServicePointManager]::SecurityProtocol = "tls12, tls11, tls" 
(enable tls otherwise it won’t be able to download the install files).

Invoke-WebRequest https://raw.githubusercontent.com/oracle/oci-cli/master/scripts/install/install.ps1 -OutFile install.ps1
(download the script).


iex ((New-Object System.Net.WebClient).DownloadString('https://raw.githubusercontent.com/oracle/oci-cli/master/scripts/install/install.ps1'))
(run the installer with prompts)


Here is the rest of  the input/output:

===> In what directory would you like to place the install? (leave blank to use 'C:\Users\Administrator\lib\oracle-cli')
: E:\oracle-cli
-- Creating directory 'E:\oracle-cli'.
-- We will install at 'E:\oracle-cli'.

===> In what directory would you like to place the 'oci.exe' executable? (leave blank to use 'C:\Users\Administrator\bin
'): E:\oracle-cli\bin
-- Creating directory 'E:\oracle-cli\bin'.
-- The executable will be in 'E:\oracle-cli\bin'.

===> In what directory would you like to place the OCI scripts? (leave blank to use 'C:\Users\Administrator\bin\oci-cli-
scripts'): E:\oracle-cli\scripts
-- Creating directory 'E:\oracle-cli\scripts'.
-- The scripts will be in 'E:\oracle-cli\scripts'.

===> Currently supported optional packages are: ['db (will install cx_Oracle)']
What optional CLI packages would you like to be installed (comma separated names; press enter if you don't need any opti
onal packages)?:
-- The optional packages installed will be ''.
-- Trying to use python3 venv.
-- Executing: ['C:\\Users\\Administrator\\Python\\python.exe', '-m', 'venv', 'E:\\oracle-cli']
-- Executing: ['E:\\oracle-cli\\Scripts\\python.exe', '-m', 'pip', 'install', '--upgrade', 'pip']
Collecting pip
  Downloading https://files.pythonhosted.org/packages/47/ca/f0d790b6e18b3a6f3bd5e80c2ee4edbb5807286c21cdd0862ca933f751dd
/pip-21.1.3-py3-none-any.whl (1.5MB)


There was an error at the end but it seemed to install successfully:


Test the oci.exe by running the oci –version command:


OCI CLI Setup

Run the oci setup config command to configure the OCI CLI. This will prompt you to input your User and Tenancy OCID values. It will also prompt whether you want to create the API RSA key pair which I will do in this example:


Here is the rest of the input/output:

Enter a user OCID:
Enter a user OCID: ocid1.user.oc1..xxxxxxxxxxxxxxxxxxxxxxxxxxxxxxxxxxxxxxxx
Enter a tenancy OCID: ocid1.tenancy.oc1..xxxxxxxxxxxxxxxxxxxxxxxxxxxxxxxxxx
Enter a region by index or name(e.g.
1: ap-chiyoda-1, 2: ap-chuncheon-1, 3: ap-hyderabad-1, 4: ap-melbourne-1, 5: ap-
mumbai-1,
6: ap-osaka-1, 7: ap-seoul-1, 8: ap-sydney-1, 9: ap-tokyo-1, 10: ca-montreal-1,
11: ca-toronto-1, 12: eu-amsterdam-1, 13: eu-frankfurt-1, 14: eu-zurich-1, 15: m
e-dubai-1,
16: me-jeddah-1, 17: sa-santiago-1, 18: sa-saopaulo-1, 19: sa-vinhedo-1, 20: uk-
cardiff-1,
21: uk-gov-cardiff-1, 22: uk-gov-london-1, 23: uk-london-1, 24: us-ashburn-1, 25
: us-gov-ashburn-1,
26: us-gov-chicago-1, 27: us-gov-phoenix-1, 28: us-langley-1, 29: us-luke-1, 30:
 us-phoenix-1,
31: us-sanjose-1): 23
Do you want to generate a new API Signing RSA key pair? (If you decline you will
 be asked to supply the path to an existing key.) [Y/n]: Y
Enter a directory for your keys to be created [C:\Users\Administrator\.oci]: E:\oracle-cli\keys
Enter a name for your key [oci_api_key]: oci_api_key
Public key written to: E:\oracle-cli\keys\oci_api_key_public.pem
Enter a passphrase for your private key (empty for no passphrase):
Private key written to: E:\oracle-cli\keys\oci_api_key.pem
Fingerprint: xx:xx:xx:xx:xx:xx:xx:xx:xx:xx:xx:xx:xx:xx
Config written to c:\oracle-cli\bin

    If you haven't already uploaded your API Signing public key through the
    console, follow the instructions on the page linked below in the section
    'How to upload the public key':

        https://docs.cloud.oracle.com/Content/API/Concepts/apisigningkey.htm#How
2


The keys were generated here:


Note that I got the config location wrong when I ran this first time (C:\oracle-cli\bin instead of E:). I'm not sure if the CLI doesn't let you use another folder than the default one but I had to create the config file in C:\Users\Administrator\.oci\config.

I just copied the contents of the file which got created by the config command earlier and created a new file called config in C:\Users\Administrator\.oci\config. I had to use the cmd mkdir command to create the folder because it starts with a full-stop.

Add the Keys to your IAM User Account

Next we need to associate the public key we created earlier with our IAM user account.

Open the oci_api_key_public.pem file and copy the entire contents (including the -----BEGIN PUBLIC KEY----- and -----END PUBLIC KEY-----).

Login to OCI and go to your IAM user account.

In the bottom left of the screen click on API Keys and then Add API Key:


Copy the contents of the public key and paste into the box:


You should then see the fingerprint and the contents which should match the config file you have on the oracle-CLI install:


Stopping and Starting OAC using the CLI Command Line

Finally we get to the nitty gritty!

Once you have configured the Oracle CLI and you have imported the keys to your IAM user account you should be able to use CLI to manage your Oracle Analytics instances (and other OCI services).

To stop OAC using CLI you run this command: 
oci analytics analytics-instance stop --analytics-instance-id <OAC instance ID>


To start OAC you run this command:
oci analytics analytics-instance start --analytics-instance-id <OAC instance ID>


You can see the commands are successful in the OAC activity log:

You can also use the GET command to get the status of the instruction:

oci analytics analytics-instance get --analytics-instance-id <OAC instance ID>


Once it is complete the lifecycle-state changes:


All that remains is to save your script as a batch file and schedule it using the standard Windows scheduler.

Other Oracle CLI Commands

There are other useful commands such as scale which allows you to scale your instance up or down.

You can find all CLI commands in the OCI CLI Command Reference guide here:

Wednesday 27 October 2021

EPM Cloud - Import Hybrid Snapshot into Non-Hybrid Pod


If you’ve ever tried to import a EPM Planning hybrid-enabled application snapshot into a non-hybrid EPM pod you will have seen this error:

EPMLCM-14000: Error reported from Core Platform.

Unsupported migration of artifacts and snapshots for Hybrid PBCS application from (Service Type ENTERPRISE with Hybrid support) to (Service Type LEGACY without Hybrid support).

The import will fail completely and you won’t be able to pull in any artefacts.

Here is a simple hack which will enable you import the entire snapshot (excluding data of course).

Download the Snapshot


Download the Hybrid snapshot to your local machine and unzip the snapshot.

You’ll need to make changes to the 'Application Definition.xpad' and 'Application Settings.xml' files:


Edit the Application Definition.xpad File


File before changes:


File after changes:


Edit the Application Settings.xml File


File before changes:


File after changes:


Once you have made these changes zip up the folders of the snapshot. Zip up the files at this level:


You can now upload the modified snapshot and import the entire application (excluding data).

To load the data into your non-hybrid pod you will need to export the data to a text file on the Hybrid environment and then import into the non-hybrid pod.


Monday 23 August 2021

EPM Cloud - Make the User Experience Simple & Intuitive with Direct Links

One great new feature which came out recently in the Oracle EPM Cloud is the ability to download direct links to any EPM Cloud navigation flow card or cluster. This includes links to both the default cards and custom cards and clusters which you have created. Task lists can now be super simple for the end user. Instead of a War and Peace list of instructions on how to navigate to User Preferences or how to open up Data Integration just give them a direct link!

How to access the EPM Cloud direct links?

Login to your EPM Cloud instance. In the top-right click on the down arrow next to your username and click on ‘Export URLs’:


This will download a .CSV file which is pipe delimited:


Adding the URL to a Task List

You can add any number of task list URL links to aid the end users. Some very useful ones could be User Preferences and Variables for a brand-new roll-out.

You can copy the URL and paste it into a URL type task list, here I’ll use the User Preferences card:


The task will look like this in their Task List:


Clicking on the task list will open up the cluster/card/tab in a new browser tab:


Here’s another example with Data Integration. Copy the Data Integration URL from the downloaded file:


Create your task list item:


Click on the task list and the Data Integration card opens up directly in a new browser tab. If you added instructions to the task list it also means the user can navigate back and forth between the tabs to read the instructions associated with the task.


Here is a link from the EPM Cloud youtube channel which demos how this functionality can also be used to streamline the user experience across the Oracle suite by embedding EPM content into Oracle ERP and Oracle NetSuite: https://www.youtube.com/watch?v=qJirlSZpTq4

In the next post we'll make things even slicker with a little touch of Groovy and the REST API.

Thursday 4 February 2021

EPM Integration Agent - MS SQL Server Windows Authentication

If you have tried to use Windows authentication in the database connection details for your Oracle EPM Integration Agent on-premises data source you may have come across these errors:

Error: com.microsoft.sqlserver.jdbc.SQLServerException: This driver is not configured for integrated authentication

com.microsoft.sqlserver.jdbc.SQLServerException: Login failed for user

So, how DO you use a Windows username and password with an EPM Integration Agent target?

mssql-jdbc_auth-9.2.0.x64.dll

You need to add the mssql-jdbc_auth-9.2.0.x64.dll to your JRE\bin and JRE\lib folder. This is the library used by the MS SQL jdbc driver for Windows authentication. 

You should be able to find the library in the .zip file you downloaded containing the MS SQL jdbc driver (sqljdbc_9.2.0.0_enu.zip\sqljdbc_9.2\enu\auth\x64).

Restart the agent and it should now be ready to use Windows authentication. But WAIT, there's one additional step...

integratedSecurity=true

You'll need to add an additional parameter to your jdbc connection string to let the driver know that you are using Windows authentication and not native MS SQL authentication:

jdbc:sqlserver://server:port;databaseName=dbname;integratedSecurity=true


Et voilĂ ! The EPM Agent will now login to your MS SQL Server database using a Windows user account for authentication. 

Happy integrating :)

Wednesday 16 December 2020

EPM 11.2 - How to Start OHS Remotely?

In the on-prem Hyperion EPM world it’s common to have one script sitting on your primary Foundation server which can start and stop all the services across all of the host machines in your environment. In 11.1.2.x this was simple because every process had a Windows service associated with it and we could use the Windows SC command to start a Windows Service remotely on another machine.


In 11.2.x there is no Windows service for the OHS component which needs to be started via the command line. ThatEPMBloke wrote a service wrapper to create a service but some customers don’t allow custom code in their environments. So in a clustered EPM 11.2.x environment how can we start our second instance of OHS from our primary Foundation server?

OHS Node Manager to the Rescue!

TLDR;

To put it simply we use the weblogic scripting tool wlst.cmd on the primary OHS server to connect to the node manager on the second OHS server and start OHS remotely.

Detail:

When you install OHS with the EPM installer it configures OHS as a standalone node. OHS needs the local OHS Node manager service running in order to start. By default each node manager instance only listens on localhost (you can’t connect to it remotely) but we can tweak the node manager Windows service to listen externally which enables us to connect from the primary node to the secondary node manager and start OHS on the secondary node.

Alter the Node Manager Listen Address

On the second OHS server:

  • Stop OHS using the command line command stopComponent.cmd ohs_component
  • Stop the OHS Node Manager Windows service
  • Open up the Windows registry at: 

HKEY_LOCAL_MACHINE\SYSTEM\CurrentControlSet\Services\Oracle Weblogic ohs NodeManager (E_Oracle_Middleware_ohs_wlserver)\Parameters


  • Edit the CmdLine parameter and find the -DListenAddress='localhost' in the string
  • Change the ListenAddress so that it listens on the hostname rather than localhost e.g. -DListenAddress='Hostname2' This enables us to connect to the node manager remotely.
  • Start the Node manager Windows service on the second OHS server

Create a Super Simple Python Script to Start OHS on Server2

We can now write a simple python script on the primary OHS server to start OHS on the secondary OHS Server.

startOHS2.py:

nmConnect('epm_admin', 'password', 'hostname2', '5557', 'ohs', 'E:/Oracle/Middleware/user_projects/EPMFDN2/httpConfig/ohs','ssl')
nmStart(serverName='ohs_component', serverType='OHS')
nmDisconnect()

  • nmConnect() - this command connects to the OHS node manager on hostname2
    • The user name and password are the Weblogic Admin credentials
    • The hostname is the servername of the second OHS server
    • 5557 is the default port that OHS NodeManager runs on in EPM installations
  • nmStart() - this command starts the OHS 'ohs_component' server on hostname2
  • nmDisconnect() - disconnects from NodeManager
Use the Weblogic Scripting Tool to run the script. You should use the wlst.cmd found in the Oracle\Middleware\oracle_common\common\bin folder:

e.g.

E:\Oracle\Middleware\oracle_common\common\bin\wlst.cmd E:\Oracle\Scripts\startOHS2.py


To stop OHS on hostname2 you can run a similar script which uses the nmKill() command to kill the secondary instance of OHS:

stopOHS2.py:

nmConnect('epm_admin', 'password', 'hostname2', '5557', 'ohs', 'E:/Oracle/Middleware/user_projects/EPMFDN2/httpConfig/ohs','ssl')
nmKill(serverName='ohs_component', serverType='OHS')
nmDisconnect()

Points of Interest

This works nicely, however it stores the password in plain text which isn't great. You can alter the nmConnect() command to use userConfigFile and userKeyFile parameters to store the encrypted user credentials.

Another point to make is that your usual "startComponent.cmd ohs_component" script won't work any more. This is because the script tries to connect to nodemanager on localhost instead of the hostname. The simple solution is to use the same startOHS2.py script on your second OHS server.


Hope you all have a safe and merry Christmas!