Showing posts with label Oracle Analytics. Show all posts

Wednesday, 1 December 2021

OAC - Using CLI to Automate Starting-Stopping of Instances

A couple of years ago I blogged on how to start and stop Oracle Analytics instances using the REST API. This enabled you to schedule scripts to manage the uptime of your instances so you can save those valuable oracle credits. This worked well for the old Autonomous instances but those scripts no longer work with the newer Gen2 OAC architecture. In this blog I’ll show how to use the Oracle CLI (Command Line Interface) to control your instances. 

The Oracle CLI is very simple to use, requires no coding skills and has the added bonus of being able to manage most of your Oracle Cloud Infrastructure tasks (e.g. managing DBaaS instances or virtual machines etc).

Pre-Requisites

You will require an IAM user account (non-IDCS) in your Oracle tenancy to run the CLI commands. You will need the OCID value for this user:


You also need the OCID value of your Oracle tenancy:


Installing the Oracle CLI on Windows


You can install on either Linux or Windows. I've chosen Windows as it's what most of our customers use. 

I followed the Oracle documentation on how to install CLI on Windows here: https://docs.oracle.com/en-us/iaas/Content/API/SDKDocs/cliinstall.htm 

Here is the process in a nutshell:
  • Download a powershell script
  • Run the powershell script. 
    • This will download the Python and install it.
    • It will also download the CLI and install it.

Initially, I installed Python manually but the auto-installer kept failing on the import ssl statement. I ended up deinstalling Python and getting the installation utility to install python for me.
This version of python is older (3.6) than the one I installed (failed with both 3.9 and 3.8).

Here are the commands you need to run:

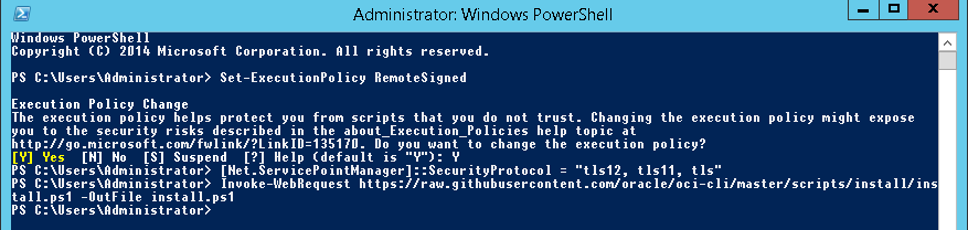
Start Powershell as an administrator.

Set-ExecutionPolicy RemoteSigned 
(allow the script to run).

[Net.ServicePointManager]::SecurityProtocol = "tls12, tls11, tls" 
(enable tls otherwise it won’t be able to download the install files).

Invoke-WebRequest https://raw.githubusercontent.com/oracle/oci-cli/master/scripts/install/install.ps1 -OutFile install.ps1
(download the script).

iex ((New-Object System.Net.WebClient).DownloadString('https://raw.githubusercontent.com/oracle/oci-cli/master/scripts/install/install.ps1'))
(run the installer with prompts)


Here is the rest of  the input/output:

===> In what directory would you like to place the install? (leave blank to use 'C:\Users\Administrator\lib\oracle-cli')
: E:\oracle-cli
-- Creating directory 'E:\oracle-cli'.
-- We will install at 'E:\oracle-cli'.

===> In what directory would you like to place the 'oci.exe' executable? (leave blank to use 'C:\Users\Administrator\bin
'): E:\oracle-cli\bin
-- Creating directory 'E:\oracle-cli\bin'.
-- The executable will be in 'E:\oracle-cli\bin'.

===> In what directory would you like to place the OCI scripts? (leave blank to use 'C:\Users\Administrator\bin\oci-cli-
scripts'): E:\oracle-cli\scripts
-- Creating directory 'E:\oracle-cli\scripts'.
-- The scripts will be in 'E:\oracle-cli\scripts'.

===> Currently supported optional packages are: ['db (will install cx_Oracle)']
What optional CLI packages would you like to be installed (comma separated names; press enter if you don't need any opti
onal packages)?:
-- The optional packages installed will be ''.
-- Trying to use python3 venv.
-- Executing: ['C:\\Users\\Administrator\\Python\\python.exe', '-m', 'venv', 'E:\\oracle-cli']
-- Executing: ['E:\\oracle-cli\\Scripts\\python.exe', '-m', 'pip', 'install', '--upgrade', 'pip']
Collecting pip
  Downloading https://files.pythonhosted.org/packages/47/ca/f0d790b6e18b3a6f3bd5e80c2ee4edbb5807286c21cdd0862ca933f751dd
/pip-21.1.3-py3-none-any.whl (1.5MB)


There was an error at the end but it seemed to install successfully:


Test the oci.exe by running the oci –version command:


OCI CLI Setup

Run the oci setup config command to configure the OCI CLI. This will prompt you to input your User and Tenancy OCID values. It will also prompt whether you want to create the API RSA key pair which I will do in this example:


Here is the rest of the input/output:

Enter a user OCID:
Enter a user OCID: ocid1.user.oc1..xxxxxxxxxxxxxxxxxxxxxxxxxxxxxxxxxxxxxxxx
Enter a tenancy OCID: ocid1.tenancy.oc1..xxxxxxxxxxxxxxxxxxxxxxxxxxxxxxxxxx
Enter a region by index or name(e.g.
1: ap-chiyoda-1, 2: ap-chuncheon-1, 3: ap-hyderabad-1, 4: ap-melbourne-1, 5: ap-
mumbai-1,
6: ap-osaka-1, 7: ap-seoul-1, 8: ap-sydney-1, 9: ap-tokyo-1, 10: ca-montreal-1,
11: ca-toronto-1, 12: eu-amsterdam-1, 13: eu-frankfurt-1, 14: eu-zurich-1, 15: m
e-dubai-1,
16: me-jeddah-1, 17: sa-santiago-1, 18: sa-saopaulo-1, 19: sa-vinhedo-1, 20: uk-
cardiff-1,
21: uk-gov-cardiff-1, 22: uk-gov-london-1, 23: uk-london-1, 24: us-ashburn-1, 25
: us-gov-ashburn-1,
26: us-gov-chicago-1, 27: us-gov-phoenix-1, 28: us-langley-1, 29: us-luke-1, 30:
 us-phoenix-1,
31: us-sanjose-1): 23
Do you want to generate a new API Signing RSA key pair? (If you decline you will
 be asked to supply the path to an existing key.) [Y/n]: Y
Enter a directory for your keys to be created [C:\Users\Administrator\.oci]: E:\oracle-cli\keys
Enter a name for your key [oci_api_key]: oci_api_key
Public key written to: E:\oracle-cli\keys\oci_api_key_public.pem
Enter a passphrase for your private key (empty for no passphrase):
Private key written to: E:\oracle-cli\keys\oci_api_key.pem
Fingerprint: xx:xx:xx:xx:xx:xx:xx:xx:xx:xx:xx:xx:xx:xx
Config written to c:\oracle-cli\bin

    If you haven't already uploaded your API Signing public key through the
    console, follow the instructions on the page linked below in the section
    'How to upload the public key':

        https://docs.cloud.oracle.com/Content/API/Concepts/apisigningkey.htm#How
2


The keys were generated here:


Note that I got the config location wrong when I ran this first time (C:\oracle-cli\bin instead of E:). I'm not sure if the CLI doesn't let you use another folder than the default one but I had to create the config file in C:\Users\Administrator\.oci\config.

I just copied the contents of the file which got created by the config command earlier and created a new file called config in C:\Users\Administrator\.oci\config. I had to use the cmd mkdir command to create the folder because it starts with a full-stop.

Add the Keys to your IAM User Account

Next we need to associate the public key we created earlier with our IAM user account.

Open the oci_api_key_public.pem file and copy the entire contents (including the -----BEGIN PUBLIC KEY----- and -----END PUBLIC KEY-----).

Login to OCI and go to your IAM user account.

In the bottom left of the screen click on API Keys and then Add API Key:


Copy the contents of the public key and paste into the box:


You should then see the fingerprint and the contents which should match the config file you have on the oracle-CLI install:


Stopping and Starting OAC using the CLI Command Line

Finally we get to the nitty gritty!

Once you have configured the Oracle CLI and you have imported the keys to your IAM user account you should be able to use CLI to manage your Oracle Analytics instances (and other OCI services).

To stop OAC using CLI you run this command: 
oci analytics analytics-instance stop --analytics-instance-id <OAC instance ID>


To start OAC you run this command:
oci analytics analytics-instance start --analytics-instance-id <OAC instance ID>


You can see the commands are successful in the OAC activity log:

You can also use the GET command to get the status of the instruction:

oci analytics analytics-instance get --analytics-instance-id <OAC instance ID>


Once it is complete the lifecycle-state changes:


All that remains is to save your script as a batch file and schedule it using the standard Windows scheduler.

Other Oracle CLI Commands

There are other useful commands such as scale which allows you to scale your instance up or down.

You can find all CLI commands in the OCI CLI Command Reference guide here:

Wednesday, 4 December 2019

OAC Remote Data Gateway Part 2: The RPD


OAC Data Gateway 105.4: Now with added RPD goodness

In one of my previous posts (here) I went through the setup of the Oracle Analytics Cloud Data Gateway utility. I showed how this could be used to connect your OAC instance to your on-premises data sources without the need of opening firewalls etc.

One missing piece of the puzzle was how to get the OAC RPD semantic layer to connect to on-premises using Data Gateway. This is a key piece of functionality that all current OBIEE customers will need if they want to connect their existing dashboards to their on-premises datasources.  Thankfully with the release of OAC 105.4 it is now possible to connect your to your on-premises data sources via your RPD using Data Gateway.

Prerequisites:
  • Install the latest version of OAC Data Gateway from here
  • Install the OAC 105.4 Admin Tool on the SAME machine

Okay, that's it for pre-reqs :)

Alors mon cher ami, how do I get this to work?

Here are the steps to connect your OAC Cloud RPD to your on-premises data sources:
  • Make sure Data Gateway is running. Check here if you need to review the setup
  • Open up the obiee_rdc_agent.properties in the Data Gateway folder and note down the port number. (Beware, this number will change automatically each time you save the Data Gateway config so alter as necessary)

  • Launch the OAC Admin Tool
  • Before you open your RPD file go to File -> Load Java Datasources...


  • Enter the following details:
    • Hostname: localhost (Data Gateway is on the same machine as your Admin Tool)
    • Port: The port you found in the obiee_rdc_agent.properties earlier
    • User: Whatever. Literally enter anything you like for the username and password, there is no authentication but this field needs to be populated
    • Password: whatever


  • You should see the following message:


  • Open your RPD 'In the Cloud'
  • Duplicate the physical source as a backup (just in case)
  • Open the connection pool select JDBC as the call interface
  • Enter the jdbc string to connect to your local db in the Connection String (SQL Server in my example jdbc:oracle:sqlserver://MySQLHostname:1433;DatabaseName=MyDatabase)

  • In the Miscellaneous tab enter the path to the jdbc driver class. In my example I'm using SQL Server com.oracle.bi.jdbc.sqlserver.SQLServerDriver but you can find the full list of JDBC and JNDI templates and examples here

  • Save your RPD and publish to the cloud
  • To test the connection try to import the metadata by right-clicking on the Connection Pool:

And that's it. All being well you should be able to view your existing dashboards in OAC sourcing the data from your on-premises databases. When we tested response times were surprisingly fast.

Wednesday, 11 September 2019

OAC - Starting and stopping instances using the REST API (Autonomous/Oracle Managed)

We waited a while to be able to start and stop OAC Oracle Managed (autonomous) instances through the OAC console but there isn't a way to schedule the starting and stopping of instances in the console. This is of course very important if you want to keep costs down by automatically shutting down your instances overnight for example.


Thankfully there are now REST API calls available for Oracle Managed OAC instances which allow you to stop and start your instances. You can schedule these commands from a scripting tool of your choice to automate this process e.g. create a batch script and schedule the start/stop using the Windows scheduler.

OAC Start Instance REST API Call

The call to start the instance is a follows:

curl -v -i -X POST -u username:password -H
"Content-Type:application/vnd.com.oracle.oracloud.provisioning.Service+json"
-H "X-ID-TENANT-NAME:idcs-<IDCS-Account-Name>"
"https://psm-cacct-<PSM-Account-Name>.console.oraclecloud.com/paas/api/v1.1/instancemgmt/idcs-<IDCS-Account-Name>/services/AUTOANALYTICSINST/instances/<Instance-Name>/start"

<IDCS-Account-Name>: You can get this by logging into your Oracle MyServices homepage and clicking on the Oracle Identity Cloud Service icon:


Your IDCS account name can be found in the URL of the new tab: 
https://idcs-ef1234567fds1234567df123456.identity.oraclecloud.com/ui/v1/adminconsole


<PSM-Account-Name>: You can get this by logging into your Oracle MyServices homepage and clicking on the Oracle Analytics Cloud icon


Your PSM account name can be found in the URL of the new tab:

https://psm-cacct-ef123456gh123456hi456.console.oraclecloud.com/psmui/faces/paasRunner.jspx?serviceType=AUTOANALYTICSINST

<Instance-Name>: You can find your instance names by clicking on the Oracle Analytics Cloud icon:


Notice in the above screenshot we have both a BI instance and an Essbase instance. These commands can be used to start/stop any of your OAC instances.

So in this example the command would be:

curl -v -i -X POST -u username:password -H
"Content-Type:application/vnd.com.oracle.oracloud.provisioning.Service+json"
-H "X-ID-TENANT-NAME:idcs-ef1234567fds1234567df123456"
"https://psm-cacct-ef123456gh123456hi456.console.oraclecloud.com/paas/api/v1.1/instancemgmt/idcs-ef1234567fds1234567df123456/services/AUTOANALYTICSINST/instances/PrdOBI/start"

Once you have launched the command you will recieve this output if the command is successful:


You should also see the message in the console saying that the startup is in progress:


Everything gets logged in the OAC activity log as you would expect:


OAC Stop Instance REST API Call

The call to start the instance is a follows:

curl -v -i -X POST -u username:password -H
"Content-Type:application/vnd.com.oracle.oracloud.provisioning.Service+json"
-H "X-ID-TENANT-NAME:idcs-<IDCS-Account-Name>"
"https://psm-cacct-<PSM-Account-Name>.console.oraclecloud.com/paas/api/v1.1/instancemgmt/idcs-<IDCS-Account-Name>/services/AUTOANALYTICSINST/instances/<Instance-Name>/stop"


Spare Oracle Credits!

You can now schedule your instances to stop when they are not being used saving you valuable Oracle Universal Credits which you could use to spin up other Oracle cloud services or add more OCPU during heavy usage periods!

Friday, 19 July 2019

OAC Remote Data Gateway: Connecting to MS SQL Server

The objective of this blog is to describe what the OAC Remote Data Gateway is, how it is configured and how to us it to connect an OAC instance to an on-premises MS SQL Server database (although the process will be the same connecting to any other on-premises data source).


The Oracle Analytics team have released a utility called the ‘Oracle Analytics Cloud Data Gateway’ which enables OAC to easily connect to your on-premises datasources with minimal fuss and WITHOUT HAVING TO OPEN UP FIREWALL PORTS!

No more awkward conversations with your network admin. No more grovelling and bribing them to open up ports in their firewall.

Current supported data sources are:
  • Oracle database
  • SQL Server
  • DB2
  • Teradata

The Oracle A-Team have written a blog here on what it does and how to configure and there is also a useful youtube video here.

What is the Oracle Analytics Remote Data Gateway?

The Data Gateway is a replacement for the Remote Data Connector which is the OAC utility to connect to your on-premises data sources. The RDC required you to deploy a webapp to your own install of Weblogic or Tomcat which can be a challenge to those not familiar with web app deployments. The RDC is still supported but it is depreciated and will no longer receive any updates. Installing Data Gateway is super-simple. It uses Jetty which is a self-contained Java HTTP web and servlet container. Your Data Gateway app is already deployed for you. All Data Gateway requires you to do is extract the zip file if on Windows or install if on Linux. I went for the Windows option.

Why don’t I need to open up my firewall? What is this Voodoo?

The honest answer is I don’t know! It uses only one-way traffic (client to server) and I’m guessing this is how it works: The Data Gateway client will repeatedly poll your OAC instance over HTTPS on a random internal port which means the connection is initiated from the Data Gateway client to the OAC server (no inbound request from OAC so opening of firewall ports not required). If the OAC server requests data then the polling client will pick up the request and send the data up to OAC. I did a network trace and there are little TLS [Client Hello], [Server Hello] handshakes occurring every second so this ensures that the connection is kept alive.

Installing Oracle Analytics Cloud Data Gateway on Windows

The install is nice and simple. Download the OAC Data Gateway 105.3 binaries for Windows from here  and just extract the zip file to any location. There isn’t actually any install required. Here is what the folder structure looks like:


Oracle Analytics Cloud Data Gateway Configuration and Techy/Geeky Stuff

I always like to know what is going on in the background so I thought I'd have a sniff around the installation and configuration.

The configuration is simple, I won’t repeat what our friends in the A-Team have published so have a look here for details. Here are the steps:

  • Extract the Datagateway folder from the zip file you downloaded from Oracle tech network
  • Launch datagateway.exe
  • Enter your OAC URL
  • Generate the security key
  • Register a new Data Gateway agent in your cloud OAC instance. Navigate to Console -> Remote Data Connectivity screen
Here is the config screen of my Data Gateway configuration screen:

URL: Here you enter the URL to your OAC instance.
Allowed Hosts: Here you can add a whitelist of server names/IPs you will allow the Data Gateway to connect to. If you leave it empty Data Gateway can connect to any address in your data centre.
Allowed SQL Statements: Enter the types of statement allowed to be executed on the target DB. Currently only select is supported.

This is what my Data Gateway agent looks like when it's registered in the OAC 'Remote Data Connectivity' screen:


Ok, now it's time to hack around the install.

When you click on save in the Data Gateway client window the configuration gets written to a properties file: \datagateway-Windows-105.3\obiee_rdc_agent.properties

Here is whats in the file:

#Wed Jul 17 12:17:47 GMT 2019
rdcURL=http\://localhost\:8641/datagateway/javads
hostWhitelist=
enableLongPoll=1
poolThreadInterval=500
oacURL=https\://dmcbi-dmcgrp.analytics.ocp.oraclecloud.com
proxyURL=proxy-url
numberOfJobPollers=2
agentID=4b81ce5f-2e09-46f1-8451-d250ee999g1c
proxyUserName=
numberOfJobsToFetch=100
proxyHost=
proxyPassword=
statementWhitelist=
numberOfJobExecutors=100
proxyPort=

Pick a port, any port...
Notice the random port number chosen by the configuration is 8641. If you change the config then the port number will change every time you click save. If you wanted you could fix the port number if you wanted by editing the .properties file. Also notice that you can add proxy server information in this file. 

Out of curiosity I tried connecting to the URL using a browser and saw this information:


Clicking on the config.jsp link opens up the config screen but over the web (just like you do on the Linux version):

There is also an interesting rdcagent page which I’m assuming will be used once Oracle get the RPD java datasource configuration working (more on this at the end of this blog)
http://localhost:8641/datagateway/static/rdcagent.js


Unfortunately there isn’t a Windows service which means that Data Gateway will not start up again automatically after a reboot of the OS. To launch the Remote Data Gateway you need to execute the dataGateway.exe manually, this then starts up the Java process for the webapp. I’m hoping Oracle will provide instructions on how to enable Data Gateway as a Windows service. When you launch datagateway.exe you will see several instances of that process in Windows Task Mgr, you will also see the Jetty java.exe process running in the background.


I've no idea why so many run in parallel.

Creating a MS SQL Server Connection

The objective of this blog is to connect to an on-premises Microsoft SQL Server database. 

Once you have configured the Data Gateway agent you can then create the connection to your on-premises MS SQL Server database.

In OAC navigate to Create -> Connection:

Enter the on-premises database host you want to connect to, the userID and the database name.This is a big plus for Data Gateway compared to older RDC. With the RDC you had to add a jdbc connection to a config file on the RDC client. With Data Gateway all connections are managed from within your OAC instance.

Eagle-eyed Essbase users will also notice that this is connecting to a SQL version of the Essbase classic ‘The Beverage Company’ (TBC) database :)

Creating an OAC Data Set

You can create an OAC data set graphically by selecting tables/columns manually. This is very simple and any end user (no SQL knowledge required) can define the data they want to analyse. The downside is that you can only select one table per data set if done graphically. You would need to create an individual data set for each table and then join them together by either using an OAC Dataflow or by adding all the data sets to a project and then joining the data sets together in the data diagram.

People that understand SQL statements can by-pass this and create only one data set using an SQL Statement using joins which combines the data from all tables. This will obviously be more efficient but requires more technical knowledge. OAC really does give you the best of both worlds, from basic end user to SQL jockey. I’ll show both ways.

For this example my TBC SQL database consists of a SALESFACT table and dimensional tables MARKET, PRODUCT, SCENARIO, SUPPLIER. 


Creating a Data Set Graphically

Okay, this is the easy way to create your data set without writing any SQL code. The downside is that you need to create one data set per table. You can write a SQL statement to join all your tables into one data set which is a lot more efficient but might not be simple for non-technical users. OAC gives us the option to do both. Scroll further down to see the SQL statement example.


You can create a data set by selecting the schema from your MS SQL Connection:


Data Gateway will then connect directly to your on-premises database and prompt you to select which schema you want to connect to, dbo in our case. Notice the 'select columns' and 'Enter SQL' radio buttons. Choose 'select columns' for the graphical mode:


Once you have selected your schema you can select which table and columns you want to add to your data set.


Here I have created a data set called TBC_MARKET (it just says MARKET in the screenshot) consisting of the STATEID column and the STATE column. When you save your data set OAC will populate that data set with the data directly from your on-premises MS SQL source.

I then go through the same process for all my other tables, one data set per table and end up with 5 data sets:


My TBC_SALESFACT data set looks like this:


My dimension columns consist of foreign keys so any reports will be meaningless. I need to join these keys with the other dimension tables to give me some meaningful results. 

I can do this two ways, using a data flow to create a final data set or by adding ALL the data sets to a project and then joining the datas sets together in the data diagram.

Joining the TBC data sets in the data diagram of a OAC Project:


Alternatively I can join the individual TBC_* data sets using a OAC data flow and saving to a new TBC_FINAL data set:


Both result in being able to visualize my data using meaningful member names:


Creating a Data Set using SQL

This is a lot more efficient because we can control the exact SQL we invoke to the on-premises SQL server and it will join all of the tables into one data set instead of having to join several data sets via a data flow or via the data diagram.

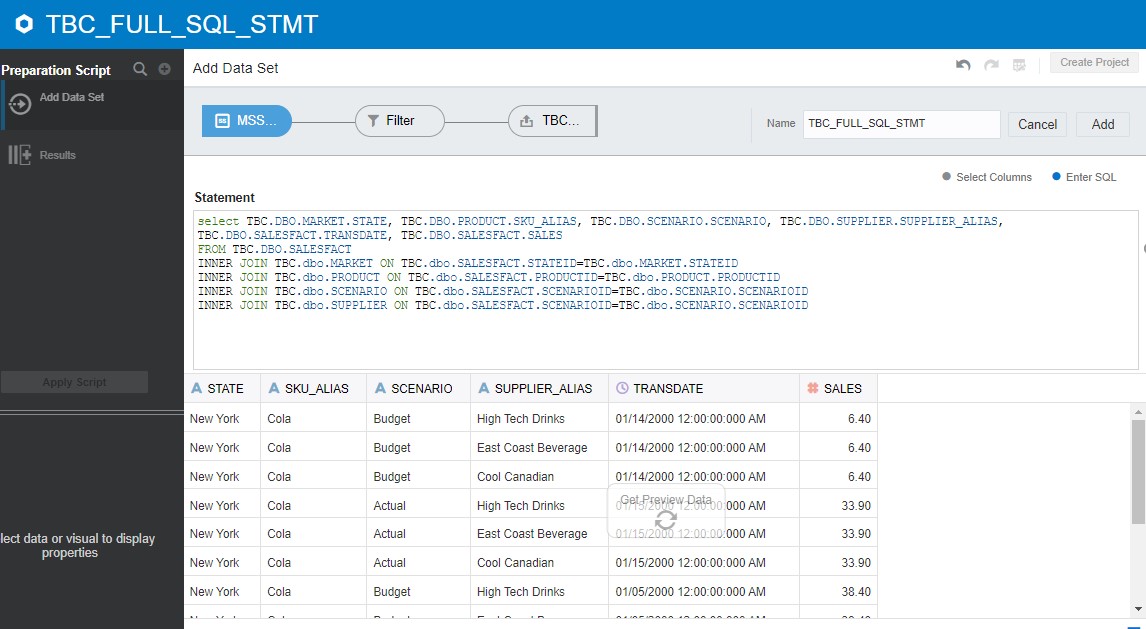
This is the SQL statement containing my joins which defines the data I want to bring into OAC:

select TBC.DBO.MARKET.STATE, TBC.DBO.PRODUCT.SKU_ALIAS, TBC.DBO.SCENARIO.SCENARIO, TBC.DBO.SUPPLIER.SUPPLIER_ALIAS, TBC.DBO.SALESFACT.TRANSDATE, TBC.DBO.SALESFACT.SALES

FROM TBC.DBO.SALESFACT

INNER JOIN TBC.dbo.MARKET ON TBC.dbo.SALESFACT.STATEID=TBC.dbo.MARKET.STATEID
INNER JOIN TBC.dbo.PRODUCT ON TBC.dbo.SALESFACT.PRODUCTID=TBC.dbo.PRODUCT.PRODUCTID
INNER JOIN TBC.dbo.SCENARIO ON TBC.dbo.SALESFACT.SCENARIOID=TBC.dbo.SCENARIO.SCENARIOID
INNER JOIN TBC.dbo.SUPPLIER ON TBC.dbo.SALESFACT.SCENARIOID=TBC.dbo.SCENARIO.SCENARIOID


We create a new data set just like we did in the previous section but we select the 'Enter SQL' radio button to enter our SQL:


I can now create a project on that one data set and visualize my data. Nice and easy and FAST!


Cached or Live Data?

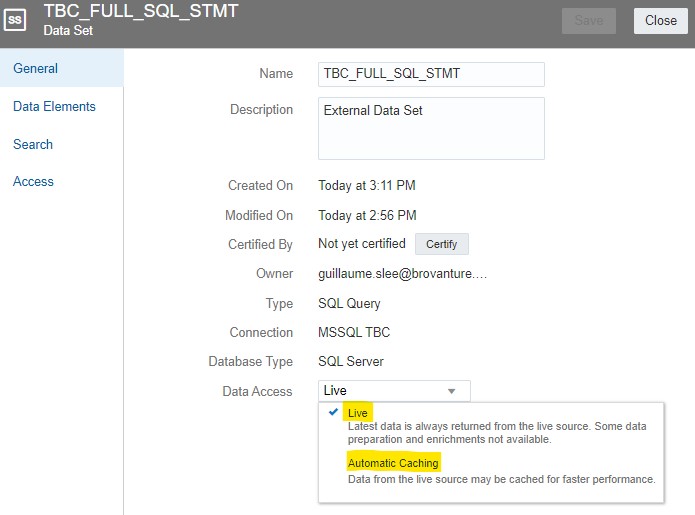
There is an option in each direct database connected data set to either cache the data or have a 'live' connection. I tested the Live connection, added a new row to my on-premises database and the new row appeared immediately in my OAC project. It does work! Caveats on caching: there is a limit to the size of data held in the cache and you can't modify that setting yet in the OAC console. Also, I don’t know how often the cache is refreshed. 


For large data sets where live data isn’t a requirement I would probably create a data flow and schedule to run overnight to a new target data set. The data wouldn’t be live but it would ensure fast data retrieval times.

Adding your Data Gateway Connection to the RDP

Edit 29/11/19: Ignore this section, with OAC update 105.4 you can now easily connect to Data Gateway using your RPD! Go here to read all about it.

Ok, I admit defeat here. I don't think there is a way to add the current Windows version of Data Gateway as a java datasource to the RPD. This works in the older Remote Data Connector. The Data Gateway config documentation seems to have been copied from the RDC docs.

In the Admin Client you are meant to go to File -> Load Java Datasources and connect to your Data Gateway. This internally connects to http://hostname:port/obiee/javads . There isn't a 'obiee' webapp present on the Windows version of Data Gateway so this must be a work in progress. Fingers crossed it should be added soon.

If I'm wrong or I find out more I'll update the blog.

Conclusions

Here is a list of positives and negatives of the current release of Data Gateway compared to the older Remote Data Connector, given the pace of new features I'm sure any negatives will soon be fixed:

Positives:
  • Very simple to install/configure
  • No need to open up any ports in your local firewall
  • All database connections are created in OAC, no need to touch the Data Gateway config

Negatives:
  • Can't add a connection in the RPD yet You can in 105.4! Look here.
  • No Windows service yet
Cheers, happy on-premises visualizing!